Using Containers
Pyxis is the primary container runtime for executing Docker containers on VISION. Note that Apptainer, Singularity, and the native Docker runtime are not supported.
Pyxis
Pyxis(opens in new window) is a plugin for the Slurm Workload Manager to run Enroot commands. It allows unprivileged cluster users to run containerized tasks in job scripts in addition to creating custom containers.
Pyxis simplifies working with NVIDIA AI–GPU-optimized containers from the NVIDIA NGC Catalog(opens in new window). You can see the image path for the latest version of NVIDIA PyTorch by selecting the "Get Container" button on the PyTorch NGC Catalog page(opens in new window).
For example, as of July 2026, the latest PyTorch container image path is: nvcr.io/nvidia/pytorch:26.06-py3
Some containers require a private API key from the NVIDIA NGC Catalog as described in the Container Credentials section on this page.
Pyxis downloads and unpacks a Docker container image on a fast local disk of each allocated compute node where it is accessed during runtime and deletes the unpacked container when processing is complete.
Pyxis uses the --container-image parameter to define which container to download from a container repo or which local .sqfs file to use.
Pyxis uses the --container-mounts parameter to mount file system directories in your container.
When a container is first run in a job script or interactive srun job, Pyxis will automatically download the container image layer files to your $SCRATCH/enroot/cache directory if they do not already exist. Pyxis will assemble the image layer files on a fast local disk on each allocated compute node for use with the current job ensuring optimal I/O during runtime. When the job is complete, the container directories on the compute node will be deleted but the downloaded cache files will remain for future use.
Your cache directory may contain many large files after you have run many different containers. You can remove the cache directory to free up space. The $SCRATCH/enroot/cache directory will automatically be recreated the next time you run a container.
cd $SCRATCH/enroot
rm -rf cache
Custom Containers
You can create a .sqfs file from the container cache files for standard as well as custom containers. The .sqfs file will take up twice as much disk space but can reduce the time it takes to unpack the container on compute nodes which is usually less than a minute.
Create a directory to store your saved .sqfs container images:
mkdir $SCRATCH/containers
You can save a container as a .sqfs file using the --container-save parameter specifying the directory and file name.
Using the --container-name parameter is not fully supported on VISION.
Example Pyxis Job Scripts
There are various ways to run a container with Pyxis. The approach you take will depend on whether the software application has single-node or multi-node support.
Example 1: Single-node #SBATCH
- downloads container cache layer files to
$SCRATCH/enroot/cacheif they do not already exist - uses the container cache files to build the container contents on a fast local disk on just one compute node when the job starts even if you request multiple nodes
- for multi-node jobs, use the container variables with an srun command instead of with the #SBATCH parameters (see Example 3)
- all commands in the job script are run inside the container
- deletes the unpacked container contents from the compute node when the job completes
- variables such as
$PWDare not supported inside the #SBATCH parameters. Use the full path to your working directory - use container options in the #SBATCH parameters for single-node jobs only
- The container does not get copied to all nodes when requesting more than one node using this approach
#!/bin/bash
#SBATCH --job-name=pytorch
#SBATCH --qos=standard
#SBATCH --output=stdout.%x.%j
#SBATCH --error=stderr.%x.%j
#SBATCH --nodes=1
#SBATCH --gpus-per-node=1
#SBATCH --ntasks-per-gpu=1
#SBATCH --cpus-per-task=14
#SBATCH --mem-per-gpu=226G
#SBATCH --time=01:00:00
#SBATCH --container-image=nvcr.io/nvidia/pytorch:26.06-py3
#SBATCH --container-mounts=/scratch/user/userid_tamu.edu/my_project_dir:/workspace

python --version
python -c "import torch; print(torch.__version__); print(torch.cuda.is_available())"
cat /etc/environment > /workspace/nvidia-pytorch-environment.txt
ls /workspace
Example 2: Single-node srun
- downloads container cache layer files to
$SCRATCH/enroot/cacheif they do not already exist - uses the container cache files to build the container contents on a fast local disk on all the allocated compute node when the srun command is run
- the srun command runs inside the container, all other job script commands are run outside the container on the file system
- deletes the unpacked container contents from the compute node when the srun command completes
#!/bin/bash
#SBATCH --job-name=pytorch
#SBATCH --qos=standard
#SBATCH --output=stdout.%x.%j
#SBATCH --error=stderr.%x.%j
#SBATCH --nodes=1
#SBATCH --gpus-per-node=1
#SBATCH --ntasks-per-gpu=1
#SBATCH --cpus-per-task=14
#SBATCH --mem-per-gpu=226G
#SBATCH --time=01:00:00

srun --container-image=nvcr.io/nvidia/pytorch:26.06-py3 \
     --container-mounts=$PWD:/workspace \
     python -c "import torch; print(torch.__version__)"

# the following command without srun will fail since it is run outside the container
python -c "import torch; print(torch.__version__)"
Example 3: Multi-node, multi-gpu AI/ML training
- downloads container cache layer files to
$SCRATCH/enroot/cacheif they do not already exist - uses the container cache files to build the container contents on a fast local disk on all allocated compute nodes when the srun command is run
- the
sruncommand runs inside the container, all other job script commands are run outside the container on the file system - Slurm uses PMIx(opens in new window) as the default mpi
- see other supported mpi types with the command:
srun --mpi=list
- see other supported mpi types with the command:
- runs the training python script
ddp_multi_node.pyscript on each node - deletes the unpacked container contents from the compute node when the srun command completes
#!/bin/bash
#SBATCH --job-name=pytorch
#SBATCH --qos=standard
#SBATCH --output=stdout.%x.%j
#SBATCH --error=stderr.%x.%j
#SBATCH --nodes=2
#SBATCH --gpus-per-node=8
#SBATCH --ntasks-per-gpu=1
#SBATCH --cpus-per-task=14
#SBATCH --mem-per-gpu=226G
#SBATCH --time=2-00:00:00

# the export commands are run outside the container to be used in the ddp_multi_node.py script

# Use first hostname from node list for MASTER_ADDR
export MASTER_ADDR=$(scontrol show hostnames $SLURM_NODELIST | head -n 1)

# Dynamically choose a random port to avoid reuse conflicts
export MASTER_PORT=$((12000 + RANDOM % 10000))

# Export NCCL debug flags for multi-node troubleshooting (optional).
export NCCL_DEBUG=INFO
export NCCL_SOCKET_IFNAME=^lo,docker

srun --container-image=nvcr.io/nvidia/pytorch:26.06-py3 \
     --container-mounts=$PWD:/workspace \
     python ddp_multi_node.py
Example 4: Interactive job - read-only container
- launches an interactive job where you can work inside the read-only container
- run the following command on the command line. You do not need a job script for this approach.
- downloads container cache layer files to
$SCRATCH/enroot/cacheif they do not already exist - uses the container cache files to build the container contents on a fast local disk on all allocated compute nodes when the srun command is run
- when the job starts, you will see the prompt change to reflect the node name like the following where you can run container-specific commands
userid_tamu.edu@dgx059:/workspace$
- when you are finished processing, type
exitor hitCtrl+dto end the interactive job - deletes the unpacked container contents from the compute node when the interactive job ends
srun --container-image=nvcr.io/nvidia/pytorch:26.06-py3 \
     --container-mounts=$PWD:/workspace \
     --qos=standard --nodes=1 --ntasks-per-gpu=1 --cpus-per-task=14 \
     --time=01:00:00 --mem-per-gpu=226G --gpus-per-node=1 \
     --pty bash
Example 5: Interactive job - create a custom container
- launches a single-node interactive session with a writable container in order to create a custom container
- downloads container cache layer files to $SCRATCH/enroot/cache if they do not already exist
- saves the custom container as a .sqfs file to the specified
--container-savefile.- you must first create the $SCRATCH/containers directory first if it does not already exist
- using the
--container-nameparameter is not fully supported on VISION - when the job starts, you will see the prompt change to reflect the node name like the following where you can run container-specific commands
userid_tamu.edu@dgx059:/workspace$
- when you are finished updating your custom container, type
exitor hitCtrl+dand wait for the exported container message:pyxis: exported container pyxis_256716.0 to /scratch/user/userid_tamu.edu/containers/my_pytorch.sqfs
- deletes the unpacked container contents from the compute node when the interactive job ends
srun --container-image=nvcr.io/nvidia/pytorch:26.06-py3 \
     --container-mounts=$PWD:/workspace \
     --container-writable \
     --container-save=/scratch/user/userid_tamu.edu/containers/my_pytorch.sqfs \
     --qos=standard --time=01:00:00 --nodes=1 --gpus-per-node=1 \
     --ntasks-per-gpu=1 --cpus-per-task=14 --mem-per-gpu=226G \
     --pty bash
Example 6: Job Script - create a custom container
- downloads container cache layer files to
$SCRATCH/enroot/cacheif they do not already exist - uses the container cache files to build the container contents on a fast local disk on the allocated compute node when the
sruncommand is run - all commands in the job script are run inside the container
- the example below installs the plotly python package in a writable container
- saves the custom container as a .sqfs file to the specified
--container-savefile- You must create the
$SCRATCH/containersdirectory if it does not already exist prior to running the job script
- You must create the
- will overwrite the
.sqfsfile if it already exists - deletes the unpacked container contents from the allocated compute node when the job completes
#!/bin/bash
#SBATCH --job-name=pytorch
#SBATCH --qos=standard
#SBATCH --output=stdout.%x.%j
#SBATCH --error=stderr.%x.%j
#SBATCH --nodes=1
#SBATCH --gpus-per-node=1
#SBATCH --ntasks-per-gpu=1
#SBATCH --cpus-per-task=14
#SBATCH --mem-per-gpu=226G
#SBATCH --time=01:00:00
#SBATCH --container-image=nvcr.io/nvidia/pytorch:26.06-py3
#SBATCH --container-mounts=/scratch/user/userid_tamu.edu/my_project_dir:/workspace
#SBATCH --container-writable
#SBATCH --container-save=/scratch/user/userid_tamu.edu/containers/pytorch-26.06-plotly.sqfs

pip3 install plotly
python -c "import plotly; print(plotly.__version__)"
Example 7: Single-node, multi-GPU - use a saved container
- uses the container
.sqfsfiles to build the container contents on a fast local disk on the allocated compute node when the srun command is run - deletes the unpacked container contents from the allocated compute node when the srun command completes
- you do not need to use
--container-nameparameter in order to use a saved container.- the
--container-nameparameter is not fully supported on VISION
- the
#!/bin/bash
#SBATCH --job-name=pytorch
#SBATCH --qos=standard
#SBATCH --output=stdout.%x.%j
#SBATCH --error=stderr.%x.%j
#SBATCH --nodes=1
#SBATCH --gpus-per-node=8
#SBATCH --ntasks-per-gpu=1
#SBATCH --cpus-per-task=14
#SBATCH --mem-per-gpu=226G
#SBATCH --time=01:00:00

srun --container-image=$SCRATCH/containers/pytorch-2.13.0-26.06.sqfs \
     --container-mounts=$PWD:/workspace \
     python -c "import torch; print(torch.__version__)"
Container Credentials
Some containers require login credentials in order to download. These credentials can be added to the Enroot ~/.config/enroot/.credentials file in your VISION home directory.
First create the following directory which will contain your .credentials file.
mkdir -p ~/.config/enroot
Create a .credentials file and add the appropriate API key or login for each container repository.
~/.config/enroot/.credentials
Change the file permissions of your .credentials file on VISION
chmod 600 ~/.config/enroot/.credentials
NVIDIA NGC Catalog Containers
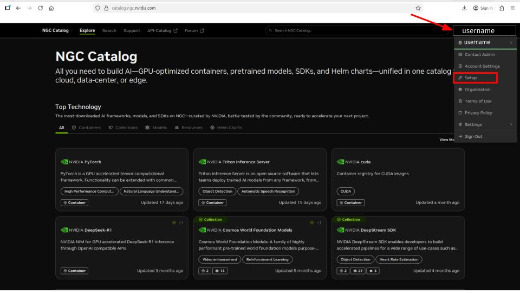
Certain NVIDIA containers require the user to obtain a private API key from NVIDIA NGC Catalog. To acquire a private key, navigate to https://catalog.ngc.nvidia.com(opens in new window) and either create an account or sign in. Once you have signed in, select the drop down menu by your username in the top-right corner and select "Setup"
Next, select the “Generate API Key”
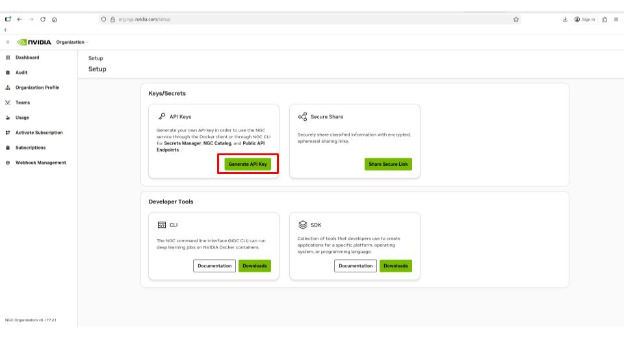
Copy the generated key to your ~/.config/enroot/.credentials file on VISION
The following is an example of the line to add to your .credentials file. Replace your_nvidia_ngc_api_key with the key you obtained from NVIDIA NGC Catalog
machine nvcr.io login $oauthtoken password your_nvidia_ngc_api_key
This only needs to be done once in order to access NVIDIA NGC containers that require an API key. You can now run your NVIDIA NGC containers on VISION compute nodes.
Quay Containers
Although a quay.io account may not be required to access some containers, it can help resolve 401 issues caused by too many anonymous pulls from the same IP address. Your account credentials for quay.io will be used with your ~/.config/enroot/.credentials file on VISION.
Example entry in your ~/.config/enroot/.credentials file using your quay_username and quay_password
machine quay.io login quay_username password quay_password
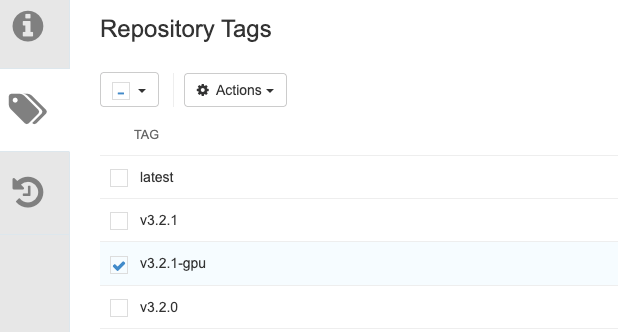
Example Pyxis image path for the quay.io container for cactus v3.2.1-gpu. You can get the tag by clicking the MANIFEST for the Tag you want and then selecting "Image Format Docker Pull (by tag)" on the container "Repository Tags" page
--container-image=quay.io/comparative-genomics-toolkit/cactus:v3.1.4-gpu
By default, your $HOME directory is not automatically mounted inside a container. You can mount your home directory for containers that create a config directory or files in your $HOME directory by using the parameter --container-mount-home
Optionally you can mount the container home directory to the current working directory to keep the container isolated from your $HOME directory contents:
--container-mounts=$PWD:/workspace,/scratch/user/userid_tamu.edu/cactus:/home/cactus_user